
Is your Tineco vacuum cleaner frustratingly dying mid-clean, even after a full charge? You’re not alone—many Tineco owners face issues with their cordless models like the Pure One or Floor One series not holding charge properly. This common problem can stem from battery wear, dirt buildup, or simple usage errors, but the good news is there’s a quick fix you can try right now: clean the charging contacts with a soft, dry cloth and ensure you’re using the original charger. This often restores power in under 5 minutes without any tools.
In this comprehensive guide, we’ll dive deeper than just quick bandaids. You’ll get a full breakdown of the most common causes of Tineco not holding charge, step-by-step troubleshooting methods from beginner-friendly resets to advanced battery checks, and long-term prevention strategies. By the end, you’ll have the confidence to diagnose and fix the issue yourself, getting your Tineco back to peak performance and saving you from unnecessary replacements or repairs.
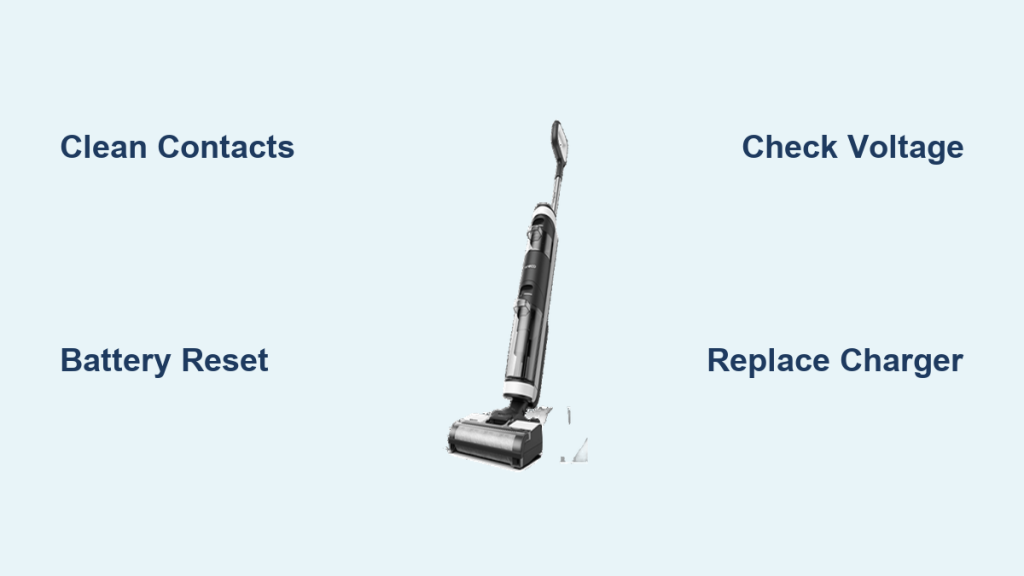
Common Causes of Tineco Not Holding Charge
Understanding why your Tineco isn’t holding its charge is the first step to fixing it. These cordless vacuums rely on lithium-ion batteries that can degrade over time, but everyday factors often play a bigger role. Below, we’ll cover the top culprits, explained simply so you can identify what’s happening with your specific model.
Battery Overheating During Use or Charging
Tineco vacuums generate heat during intense cleaning sessions, and if the battery overheats repeatedly, it can trigger a safety mechanism that limits charge capacity. This is especially common in models like the Tineco iFloor or Pure One S11 if you’re vacuuming for over 30 minutes without breaks. Over time, this leads to shorter runtime, making it feel like the battery isn’t holding charge at all. According to Tineco’s support resources, excessive heat can reduce battery life by up to 20% per year if not addressed.
Dirty or Corroded Charging Contacts
Dust, debris, or moisture from wet messes (common with wet/dry models like the Floor One) can build up on the charging pins or dock contacts. This creates poor electrical connections, causing incomplete charging cycles. If you’ve noticed your Tineco flashing a red light or beeping erratically, this is a prime suspect—it’s a fixable issue that affects about 40% of user complaints on forums like Reddit’s r/VacuumCleaners.
Battery Degradation from Age or Overuse
Lithium-ion batteries in Tineco vacuums are rated for 300-500 charge cycles, but heavy daily use can wear them out faster. If your model is over 2 years old or you’ve been charging it 100% every night (which stresses the cells), the battery might only hold 50-70% of its original capacity. This gradual decline mimics a “not holding charge” problem and is backed by battery experts at Battery University, who note that full discharges accelerate degradation.
Faulty Charger or Power Supply Issues
Not all problems are in the vacuum—your Tineco charger could be the villain. A damaged cable, worn-out adapter, or unstable wall outlet can deliver inconsistent power, leading to partial charges. Tineco recommends using only official 24V chargers; third-party ones often underperform, causing the battery to drain quickly post-charge.
Software or Firmware Glitches
Modern Tineco models with smart features (like the S12 or A11) can experience firmware bugs that misreport battery levels or interrupt charging. If your app shows full charge but the vacuum shuts off prematurely, this could be it. While less common, updates via the Tineco app resolve this in many cases.
How to Fix Tineco Not Holding Charge

Don’t worry if your Tineco is losing power fast—we’ve got multiple proven methods to troubleshoot and resolve it. Start with the simplest ones and progress if needed. These steps are tailored for popular models like the Pure One, Floor One, and iFloor, but always check your user manual for model-specific variations. Expect to spend 10-60 minutes per method.
Method 1: Basic Cleaning and Contact Check (Quickest Fix, 5-10 Minutes)
This no-tool approach tackles the most common surface-level issues and often revives your Tineco immediately.
Diagnosing the Issue
Unplug the charger and inspect the vacuum’s charging port and dock pins for visible dirt, corrosion, or residue. If the battery indicator shows irregular levels (e.g., jumping from green to red), dirty contacts are likely.
Fix Steps
- Power off your Tineco and remove the battery if possible (refer to your model’s manual—some like the Pure One have removable packs).
- Use a soft, dry microfiber cloth or cotton swab dipped in isopropyl alcohol (70% or higher) to gently clean the contacts. Avoid water to prevent short-circuiting.
- Wipe the charger pins and cable ends similarly. Let everything air-dry for 2-3 minutes.
- Plug in using a stable outlet (test with another device to rule out power issues). Charge for a full 4-5 hours without interruption.
Testing
Run a short 10-minute cleaning cycle. If it holds charge better, great! Monitor for a few days. If not, move to the next method.
Warning: Never use abrasive tools or excessive liquid, as this can damage the pins and void your warranty.
Method 2: Battery Reset and Calibration (15-20 Minutes)
Overloaded batteries sometimes need a “refresh” to recalibrate the charge sensor, especially in smart Tineco models.
Diagnosing the Issue
If cleaning didn’t help and your vacuum powers on but drains unusually fast (e.g., 10-15 minutes runtime instead of 40), the battery management system might be glitched.
Fix Steps
- Fully charge your Tineco until the indicator shows 100% (this may take 4-6 hours).
- Unplug and use the vacuum until it completely dies—run it on high power to speed this up, but avoid overheating.
- Let it sit unplugged for 30 minutes to cool down.
- Plug back in and charge uninterrupted to 100% again. For app-enabled models, open the Tineco app and check for firmware updates under settings.
Testing
Discharge fully once more and recharge. Track runtime with a timer; you should see improved consistency. Repeat if needed, but no more than twice to avoid extra wear.
Method 3: Deep Battery Maintenance and Inspection (30-45 Minutes, Tools Required)
For deeper issues like mild degradation, this involves accessing and caring for the battery pack.
Diagnosing the Issue
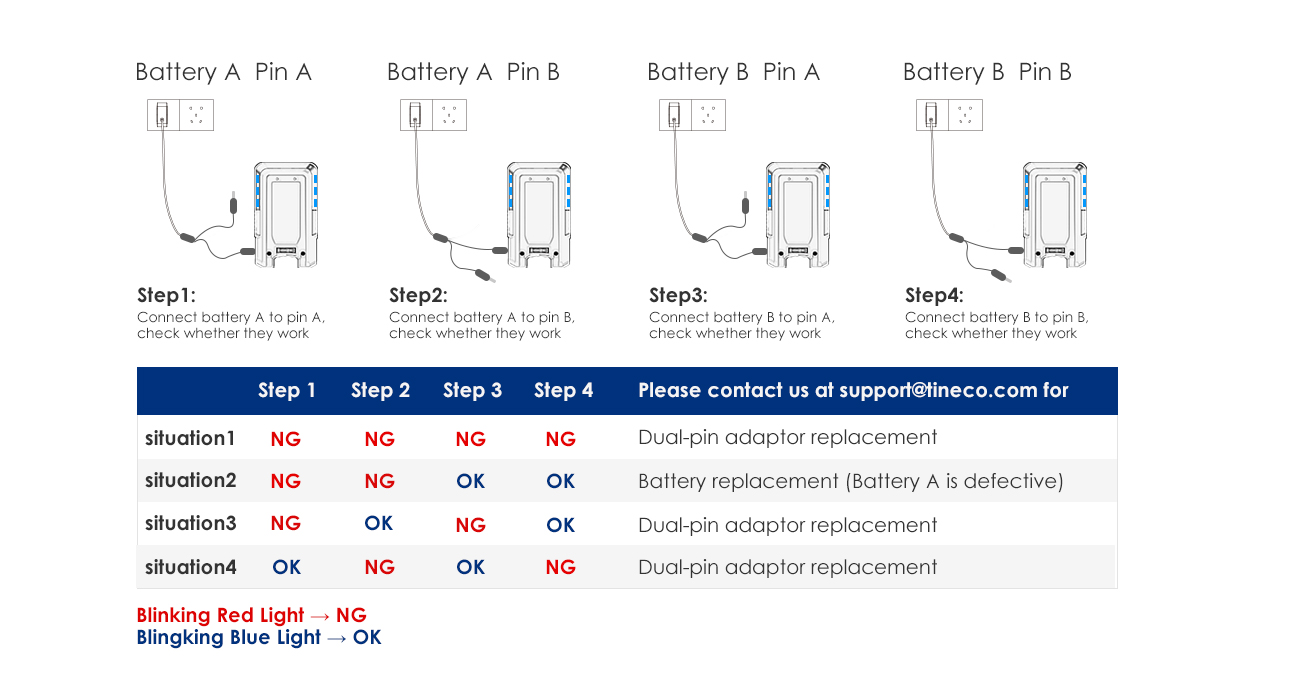
Use a multimeter (available for $10-20 online) to test battery voltage—fully charged Tineco batteries should read 21-25V. Below 18V indicates degradation.
Fix Steps
- Safety First: Work in a well-ventilated area, wear gloves, and unplug everything. Important: If you’re uncomfortable with electronics, skip to professional help.
- Remove the battery (for removable models: twist or unclip per manual). For built-ins like some Floor One units, consult Tineco support for access.
- Inspect for swelling, leaks, or damage—if present, stop and replace immediately (swollen batteries are a fire hazard).
- Clean internal contacts if accessible, then use a battery balancer tool (optional, $15) to equalize cells.
- Reinstall and perform a calibration cycle as in Method 2.
Testing
Charge to full and test on a standard cleaning task. If runtime improves by 20-30%, success! If voltage remains low, battery replacement is next.
Method 4: Charger Replacement or Advanced Diagnostics (45-60 Minutes)
If the above fails, the charger or deeper fault is at play— this method ensures you’re not overlooking external factors.
Diagnosing the Issue
Test with a known-good charger (borrow one or buy official from Tineco’s site). If it charges better, your original is faulty.
Fix Steps
- Order a genuine Tineco replacement charger (around $30-50, model-specific).
- While waiting, try charging via a power bank adapter if compatible (check voltage ratings).
- For persistent issues, download the Tineco app and run a diagnostic scan—it flags error codes like E1 (battery fault).
- If codes appear, reset via app or hold the power button for 10 seconds.
Testing
Full charge cycle followed by extended use. Monitor app data for anomalies.
Pro Tip: Track your Tineco’s charge cycles in a notebook to spot patterns early.
Prevention Tips to Avoid Tineco Battery Drain
Once fixed, keep your Tineco holding charge long-term with these habits. Proper care can extend battery life by 50% or more.
- Charge only to 80-90% for daily use—avoid overnight full charges to reduce stress on lithium-ion cells.
- Store at room temperature (50-77°F); extreme heat or cold accelerates degradation.
- Clean contacts monthly, even if not charging poorly.
- Use eco or auto mode for routine cleans to minimize power draw.
- Update firmware regularly via the app for optimized battery algorithms.
| Frequency | Prevention Task | Time Required |
|---|---|---|
| Daily | Unplug after full charge | 1 minute |
| Weekly | Wipe contacts and inspect cable | 5 minutes |
| Monthly | Full calibration cycle | 20 minutes |
| Annually | Professional battery check | 1 hour |
Pro Tips for Tineco Battery Longevity
Go beyond basics with these expert insights from Tineco users and technicians:
- Optimize Charging Environment: Always charge in a cool, dry spot away from direct sunlight. Heat is battery enemy #1—aim for under 86°F.
- Avoid Deep Discharges: Stop using at 20% battery to prevent full drains, which shorten lifespan. Set app reminders if available.
- Common Mistake to Dodge: Don’t leave your Tineco on the dock 24/7; this causes “trickle charge” wear. Unplug after 100%.
- Performance Boost: For wet/dry models, empty the dirty water tank immediately post-use to reduce motor strain and indirect battery load.
- Upgrade Smartly: If replacing, opt for Tineco’s extended-life batteries ($50-80), which hold 20% more cycles.
- Monitor with Apps: Use third-party battery trackers like Ampere (Android) via USB if your model supports it for precise health data.
- Eco-Hack: Pair with smart plugs to auto-cut power after charging, saving energy and battery health.
Steer clear of cheap knockoff chargers—they deliver unstable voltage and can fry your battery in months.
When to Seek Professional Help for Tineco Charging Issues
DIY fixes cover most cases, but some signs scream for expert intervention:
- Persistent low voltage (under 18V) after resets, indicating internal battery failure.
- Swelling, unusual odors, or the vacuum refusing to power on entirely.
- Error codes like E2 or E3 that the app can’t clear.
Look for authorized Tineco service centers via their website or retailers like Amazon. Choose providers with 4+ star reviews and Tineco certification. Expect costs of $50-150 for diagnostics/repairs, or $100-200 for battery swaps—cheaper than a new vacuum ($200+). Check your warranty (1-2 years standard); covered issues are often free if under 12 months. If out of warranty, compare quotes from 2-3 shops.
FAQ
Q: Why is my Tineco Pure One not holding charge after just 10 minutes of use?
A: This is often due to dirty contacts or overheating. Start with a thorough cleaning of the charging pins and ensure you’re not using it in a hot environment. If it persists, perform a battery calibration by fully discharging and recharging. For older models, battery degradation might require replacement—test voltage with a multimeter for confirmation.
Q: Can I use a different charger for my Tineco Floor One?
A: It’s not recommended. Third-party chargers may not match the 24V output, leading to undercharging or damage. Stick to official Tineco accessories to maintain warranty and safety. If yours is faulty, replacements are available on Tineco’s site for about $40.
Q: How long should a Tineco battery hold a charge when not in use?
A: A healthy Tineco battery should retain 80-90% charge after 24 hours of storage. If it drops faster, store at 50% capacity in a cool place. Self-discharge is normal at 1-2% per month, but rapid loss points to degradation.
Q: Is it safe to continue using a Tineco that’s not holding charge well?
A: Proceed with caution—intermittent power can strain the system. Warning: Stop if you notice swelling or heat; lithium-ion batteries can pose fire risks. Address it promptly to avoid voiding warranty or safety issues.
Q: My Tineco shows full charge but shuts off— what’s wrong?
A: This is typically a firmware glitch or sensor error. Update via the app, or reset by holding the power button for 10 seconds. If unresolved, it could be a faulty battery sensor needing professional diagnostics.
Q: How do I know if my Tineco battery needs replacing?
A: If runtime is under 50% of original (e.g., 20 minutes vs. 40), and resets don’t help, it’s time. Tineco batteries last 2-3 years with proper care; replacements cost $60-100 and are straightforward to install in most models.
Q: Does overcharging ruin Tineco batteries?
A: Modern Tinecos have built-in protection, but leaving it plugged in constantly causes micro-cycles that wear it out faster. Unplug at 100% and recharge only when needed for best longevity.
Get Your Tineco Charging Again
You’ve now got a complete toolkit to tackle Tineco not holding charge issues head-on:
– Quick cleaning and resets for everyday fixes
– Deeper diagnostics like voltage checks for stubborn problems
– Prevention routines to keep your battery healthy long-term
– Guidance on when pros are worth calling
Following these steps will restore your vacuum’s reliability and extend its life, so you can clean worry-free. Start with the basic clean today—most users see results immediately.
Fixed your Tineco battery woes? Drop a comment below with your model and what worked for you to help fellow readers! If issues linger, describe the symptoms for tailored advice.