
If you’ve noticed your Tineco vacuum’s performance dropping—picking up less dirt or making unusual noises—it’s likely time to tackle the brush roller. The brush roller is the heart of your Tineco’s cleaning power, but it can quickly accumulate hair, debris, and grime, leading to clogs and reduced suction. Don’t worry; cleaning your Tineco brush roller is a straightforward process that can restore its efficiency in under 30 minutes with the right steps.
In this comprehensive guide, we’ll go beyond a basic wipe-down to cover everything you need: from why regular cleaning matters, to a detailed step-by-step process, frequency recommendations, and pro tips for long-term maintenance. By the end, you’ll have your Tineco brush roller sparkling clean and your vacuum running like new, preventing costly repairs down the line.
Why Regular Cleaning of Your Tineco Brush Roller is Essential
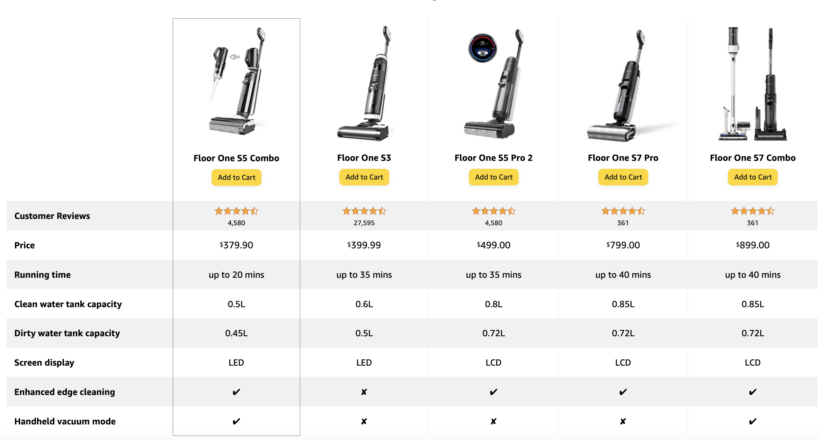
Your Tineco vacuum, whether it’s a model like the iFloor, Pure One, or A10 series, relies on the brush roller to agitate dirt and pet hair from floors and carpets. Over time, this essential component gets clogged with tangled hair, dust bunnies, and sticky residues from everyday messes. Neglecting it can lead to several issues: diminished suction power, uneven cleaning, overheating, or even motor strain that shortens the vacuum’s lifespan.
Regular cleaning not only boosts performance but also maintains hygiene in your home. A dirty brush roller can redistribute allergens and bacteria back onto your floors, which is especially problematic for allergy sufferers or pet owners. According to Tineco’s official maintenance guidelines, a well-maintained brush roller can extend your vacuum’s usability by up to 50%, saving you money on replacements. Plus, it’s an easy way to keep warranty coverage intact—most Tineco models require proof of routine care for claims.
How Often to Clean Your Tineco Brush Roller
The cleaning frequency for your Tineco brush roller depends on usage intensity, floor types, and household factors like pets or high-traffic areas. As a general rule, inspect and clean it after every few uses to catch buildup early. Tineco recommends a full deep clean every 1-2 months for average homes, but adjust based on your needs.
Here’s a handy maintenance schedule to follow:
| Frequency | Task | Duration |
|---|---|---|
| After Every 2-3 Uses | Quick visual inspection and removal of visible hair/debris | 5 minutes |
| Weekly | Surface wipe-down and detangling for light users (no pets/kids) | 10 minutes |
| Bi-Weekly | Full disassembly and rinse for moderate use (1-2 pets or busy home) | 15-20 minutes |
| Monthly | Deep clean with soap and drying for heavy use (multiple pets, carpets) | 25-30 minutes |
| Every 3-6 Months | Replace if worn (bristles frayed or roller damaged) | N/A (purchase new) |
By sticking to this schedule, you’ll avoid major clogs and keep your Tineco performing optimally. Track your cleanings in a simple app or calendar to stay consistent.
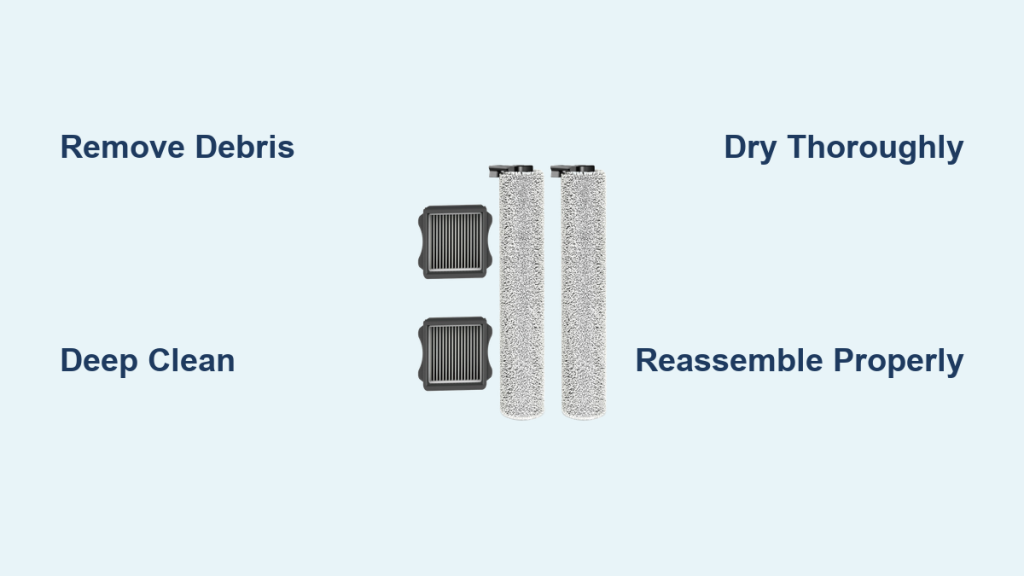
Complete Tineco Brush Roller Cleaning Process
Cleaning your Tineco brush roller doesn’t require fancy tools—just some patience and basic household items. This process works for most Tineco models, but always check your user manual for model-specific variations (e.g., the S5 series has a slightly different access panel). Expect the full clean to take 20-30 minutes, including drying time. Work in a well-ventilated area, and unplug your vacuum first for safety.
Step 1: Gather Your Supplies and Prepare
Before diving in, assemble everything to make the process smooth. You’ll need:
- Mild dish soap (like Dawn, which cuts grease without damaging plastics)
- Warm water
- Soft-bristle brush or old toothbrush
- Scissors or a seam ripper for cutting hair
- Clean towels or microfiber cloths
- Optional: A flathead screwdriver for stubborn clips (on some models)
Important: Turn off and unplug your Tineco vacuum. If it’s a cordless model, remove the battery to prevent accidental starts. Lay down newspapers or a towel to catch drips and make cleanup easy.
Step 2: Remove the Brush Roller
Accessing the brush roller is quick on Tineco vacuums—designed for user-friendly maintenance. For most models like the Pure One S11 or iFloor 3:
- Flip the vacuum upside down to expose the underside.
- Locate the brush roller cover (usually a plastic guard near the front wheels). Press the release tabs or slide the lever to pop it open— it might click or snap.
- Gently pull out the brush roller assembly. It may have end caps or belts attached; slide it sideways to detach from the slots. If it’s stuck due to debris, wiggle carefully without forcing it.
Warning: Avoid yanking forcefully, as this could damage the belt or housing. If your model has a self-cleaning feature (like some A11 variants), run a quick self-clean cycle first to loosen debris.
Time estimate: 2-3 minutes.
Step 3: Initial Debris Removal
With the brush roller out, tackle the bulk of the mess:
- Use scissors to cut away long hair or strings wrapped around the roller. Hold the roller steady and snip parallel to the axis, avoiding the bristles.
- Pick off larger debris like pet hair clumps or lint with your fingers or tweezers.
- Tap the roller gently over a trash bin to dislodge dust.
For stubborn tangles, run the edge of your scissors lightly along the roller to free fibers without scratching. This step prevents further clogs during washing.
Step 4: Deep Clean and Rinse
Now, for the thorough wash:
- Fill a basin or sink with warm (not hot) water and add a few drops of mild soap. Submerge the brush roller for 5-10 minutes to loosen grime.
- Use a soft-bristle brush to scrub the bristles and cylinder. Focus on the ends where buildup is common, and get into the grooves. For anti-tangle models (like the Pure One S15), pay extra attention to the spiral brush pattern.
- Rinse under running lukewarm water until the water runs clear—no soap residue should remain, as it can attract more dirt later.
- If odors persist (from pet messes), add a splash of white vinegar to the soak water for natural deodorizing.
Tip: For cordless Tineco models, avoid soaking the entire assembly if it includes electrical parts; wipe those with a damp cloth instead.
Time estimate: 10-15 minutes.
Step 5: Dry and Reassemble
Drying is crucial to prevent mold or rust:
- Shake off excess water and pat dry with a towel.
- Air-dry completely on a rack or towel for at least 4-6 hours (overnight is ideal). Stand it upright to ensure even drying.
- Once dry, inspect for damage: Replace if bristles are bent, missing, or if the roller wobbles.
Reinsert the brush roller:
- Align the ends with the vacuum’s slots and slide it back in until it clicks.
- Secure the cover and test-spin the roller by hand—it should rotate freely.
- Reattach the battery or plug in, then run a short test on a clean floor to check for vibrations or noises.
Troubleshooting if it doesn’t fit: Ensure no debris is in the slots. If the belt is loose, consult Tineco’s support for a replacement guide.
By following these steps, your Tineco brush roller will be free of 99% of buildup, restoring full suction.
Warning Signs That Indicate Immediate Attention Needed
Don’t wait for your scheduled clean—watch for these red flags that signal your Tineco brush roller needs urgent care:
- Reduced Suction or Streaks on Floors: If dirt isn’t picking up or leaves tracks, tangles are blocking airflow.
- Unusual Noises: Grinding or rattling during use often means debris is caught in the roller.
- Overheating: The vacuum shutting off mid-clean could indicate a clogged roller straining the motor.
- Visible Buildup: Hair wrapped tightly or excessive dust around the base.
- Odor During Use: A musty smell points to trapped moisture or bacteria.
Addressing these promptly prevents bigger issues like voided warranties or full motor failure, which can cost $100+ to repair.
Pro Tips for Tineco Brush Roller Maintenance
To get the most out of your cleaning routine and avoid common pitfalls, here are expert insights from Tineco users and technicians:
- Use the Right Tools: Opt for plastic-ended seam rippers instead of metal scissors to prevent nicks on the roller surface.
- Prevent Pet Hair Woes: For furry households, attach a hair removal tool like a rubber pet brush to the roller periodically—it grabs strands before they tangle.
- Eco-Friendly Cleaners: Skip harsh chemicals; vinegar and baking soda mixtures work wonders for tough stains without harming the environment.
- Optimize Storage: After cleaning, store your Tineco upright in a dry spot to keep the brush roller from compressing and deforming.
- Track Wear and Tear: Mark your calendar for bi-annual inspections. Tineco brush rollers typically last 6-12 months with proper care; buy replacements from official sources to match your model.
- Common Mistake to Avoid: Never use a washing machine—high speeds can warp the plastic and damage bristles.
- Boost Performance: After reassembly, vacuum a small test area with baking soda sprinkled on the floor to deodorize and test suction.
These tips can cut your cleaning time in half over time and extend the roller’s life by months.
When to Seek Professional Help

While DIY cleaning handles 90% of issues, some situations call for pros:
- Severe Damage: If the roller is cracked, the belt is broken, or internal gears are jammed—DIY fixes risk further harm.
- Persistent Problems: After cleaning, if suction doesn’t improve or error codes appear (e.g., on smart Tineco models), it might be a deeper issue like a faulty motor.
- Warranty Coverage: If your Tineco is under the standard 2-year warranty, contact authorized service to avoid voiding it.
Look for certified Tineco repair shops via their website or retailers like Amazon. Expect costs of $20-50 for a basic service, or $50-100 for roller replacement. Always provide your model number (found on the bottom) for accurate quotes. User reviews on sites like Best Buy highlight responsive service from Tineco’s support team—start there before third-party help.
FAQ
Q: Can I put the Tineco brush roller in the dishwasher?
A: No, dishwashers use high heat and harsh detergents that can melt plastic components or degrade bristles. Stick to hand-washing with mild soap to preserve the roller’s integrity and avoid warranty issues.
Q: How do I know if my Tineco brush roller needs replacing?
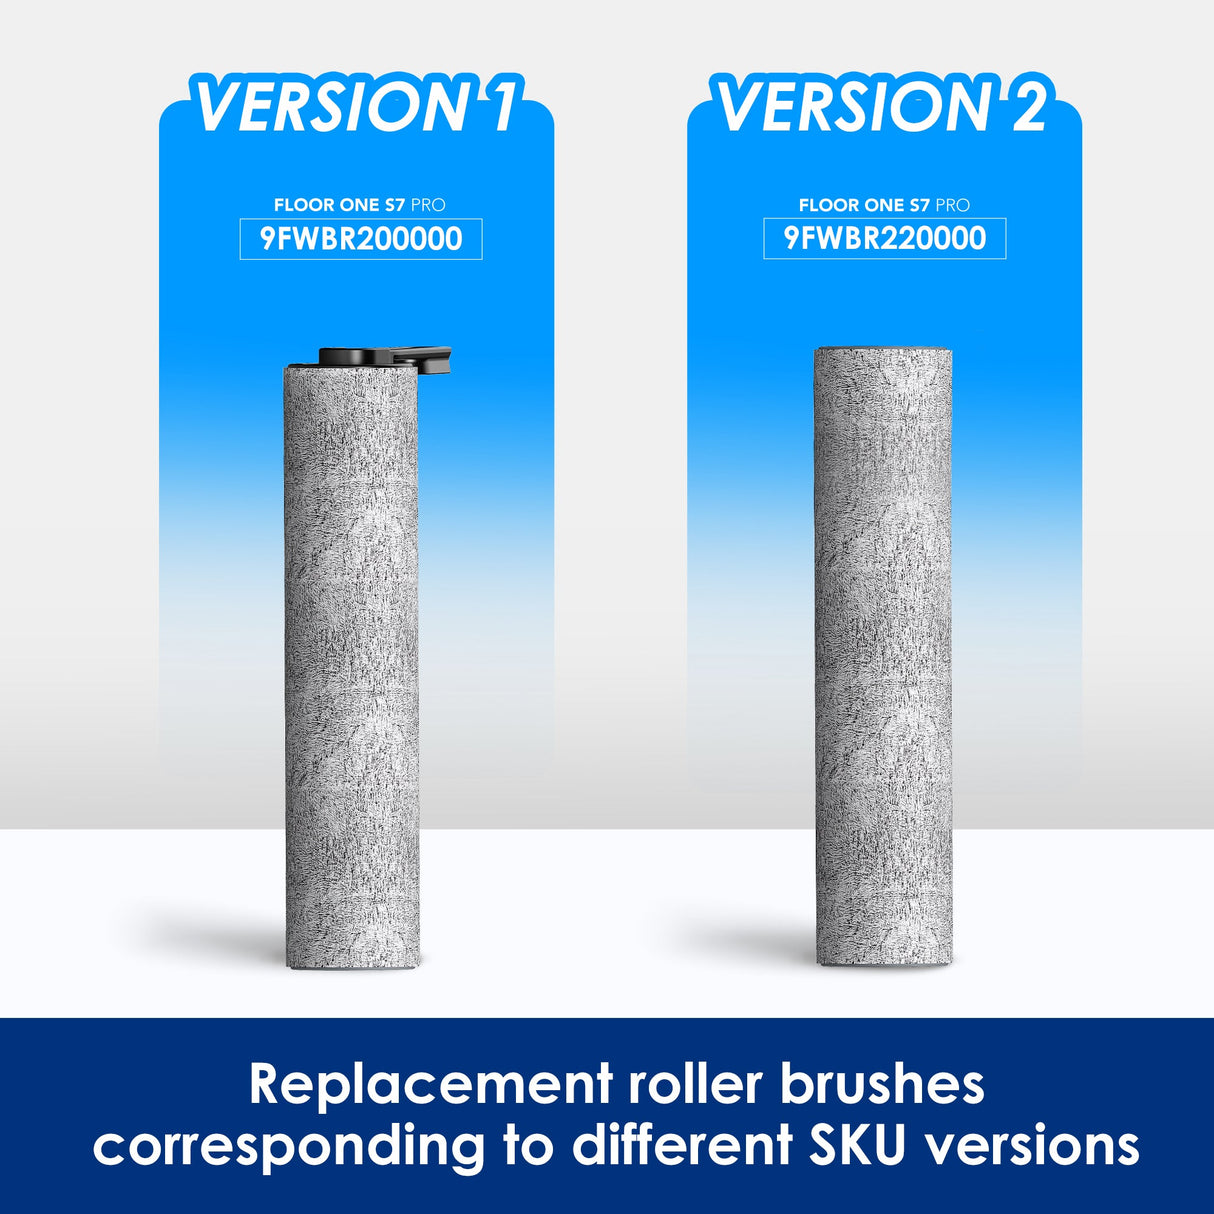
A: Signs include frayed or missing bristles, wobbling during spins, or if cleaning doesn’t restore performance. Tineco rollers are model-specific; check their site for compatible parts, priced around $20-40.
Q: Is cleaning the brush roller safe for all Tineco models?
A: Yes, for most like the Floor One S3 or A20, but cordless models with integrated batteries require extra caution—remove the battery first. Refer to your manual for any unique disassembly steps.
Q: What if water gets inside the vacuum during cleaning?
A: Wipe it dry immediately with a cloth and let it air out for 24 hours before use. If it affects electronics, dry thoroughly or seek pro help to prevent short-circuiting.
Q: How long does a cleaned Tineco brush roller take to dry fully?
A: 4-6 hours minimum, but overnight is best to ensure no moisture remains, which could lead to mold or slippage during use.
Q: Can I clean the brush roller while the vacuum is running?
A: Absolutely not—it’s a safety hazard and could damage the motor. Always unplug and disassemble fully for safe, effective cleaning.
Q: Does Tineco have a self-cleaning brush roller option?
A: Some advanced models like the Pure One S12 have auto-tangle prevention, but manual cleaning is still needed monthly. Check your model’s features for built-in rinse functions.
Keep Your Tineco Running Smoothly
With this guide, maintaining your Tineco brush roller is no longer a chore—it’s a quick win for better cleaning results and a longer-lasting vacuum. You’ve got the full process: from removal and deep cleaning to drying tips and warning signs, plus a schedule to stay ahead of issues.
Follow these steps regularly, and you’ll enjoy powerful suction without the frustrations of clogs or weak performance. Your floors (and your sanity) will thank you.
Ready to give your Tineco a refresh? Try the cleaning process today and share your before-and-after results in the comments below—we’d love to hear how it went! If you have questions about your specific model, drop them here for tailored advice.